YurkP takes another step towards the completion of his Cuban House of Diversity model. This week, follow along through the ins and outs of texturing and learn the general operation of Substance Painter software. You can read other parts of this tutorial here.
Modeling the Lattice in 3ds Max
I’m happy to share with you my construction of the lattice portion of this model. I spent two days on this section, but, I’d like to mention that it isn’t 100% correct. I could have created a high poly lattice and baked it on a plane (normals, AO, alpha). Instead, I painted the alpha manually in Photoshop, sculpted separate details in Zbrush, and baked them on a thin model with the alpha. I then textured it in Substance Painter and added normal maps right there. Here is my black and white alpha for the lattice:
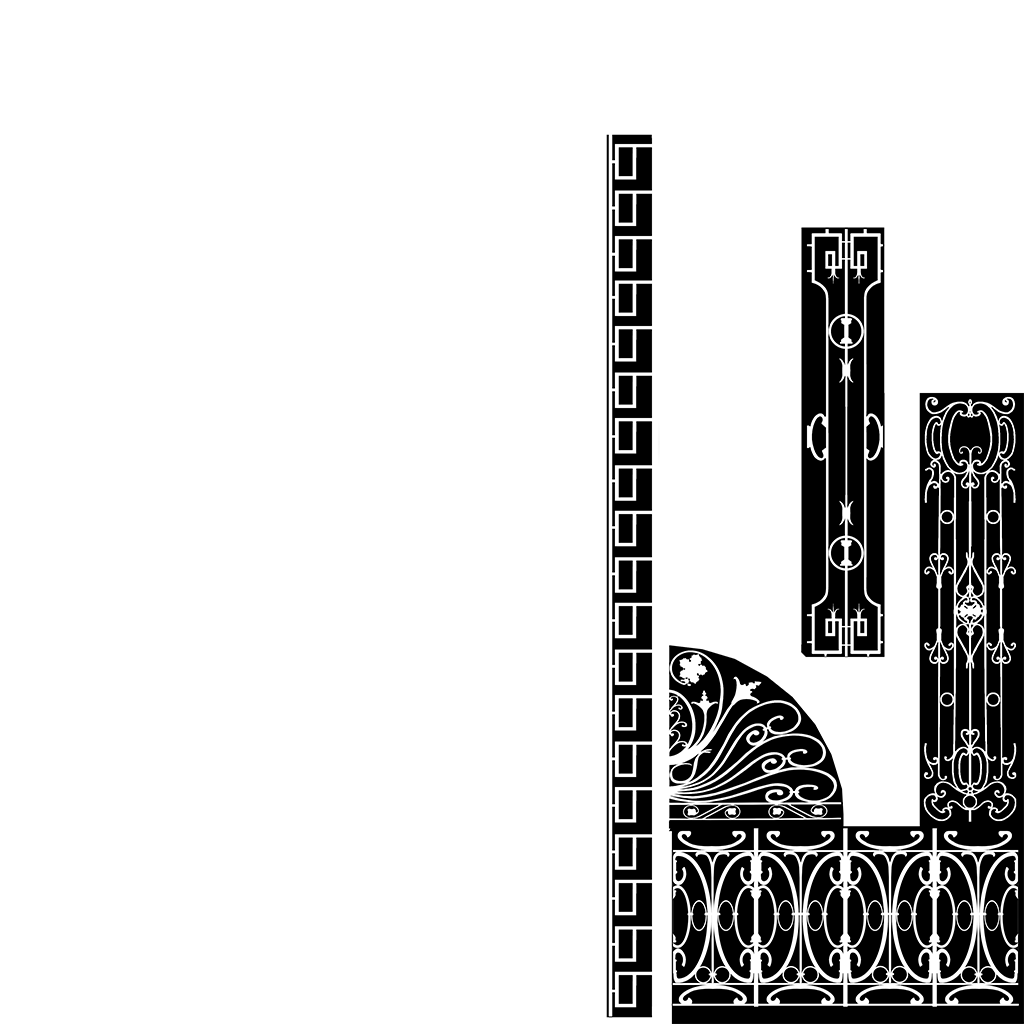
The black color defines totally transparent areas while the white color defines opaque areas. If it isn’t transparent, then it needs to be filled with white. Also, to achieve a more realistic effect, I modeled the framing, so that it's made of a solid piece.
I created a simple base model for my lattice and made it thin, like a plane (image 1). I analyzed the real fence and after this, and decided to cut the model to use less UV space. After unwrapping and creating the alpha map (which I showed you above), I textured the model in Substance Painter (image 2). When I applied the texture to the model in 3ds Max, I noticed that it's not realistic enough. So, I decided to add some solid framing (image 3). I unwrapped it and placed it on a previously created texture. This part shares the same UV space with the lattice, but in the opaque zone only.
When I applied the texture to the whole model, I thought the result was quite nice (image 4), especially when I compared the overall look without textures (image 5), to the overall look with textures (image 6)
Also, I duplicated my planar mesh and pushed it in 3 mm to create an effect of a thick surface (image 7). Up close, it looks a bit weird, but from a far distance, it’s fine.
Regarding the UV, I unwrapped only the right part of the model (image 8). All other parts use the same UV space. Afterwards, I duplicated my mesh and completed the front facade (image 9).
Preparing a Model for Baking and Texturing in Substance Painter
Now, I want to show my texturing process in a nutshell. I will start with preparation for baking:
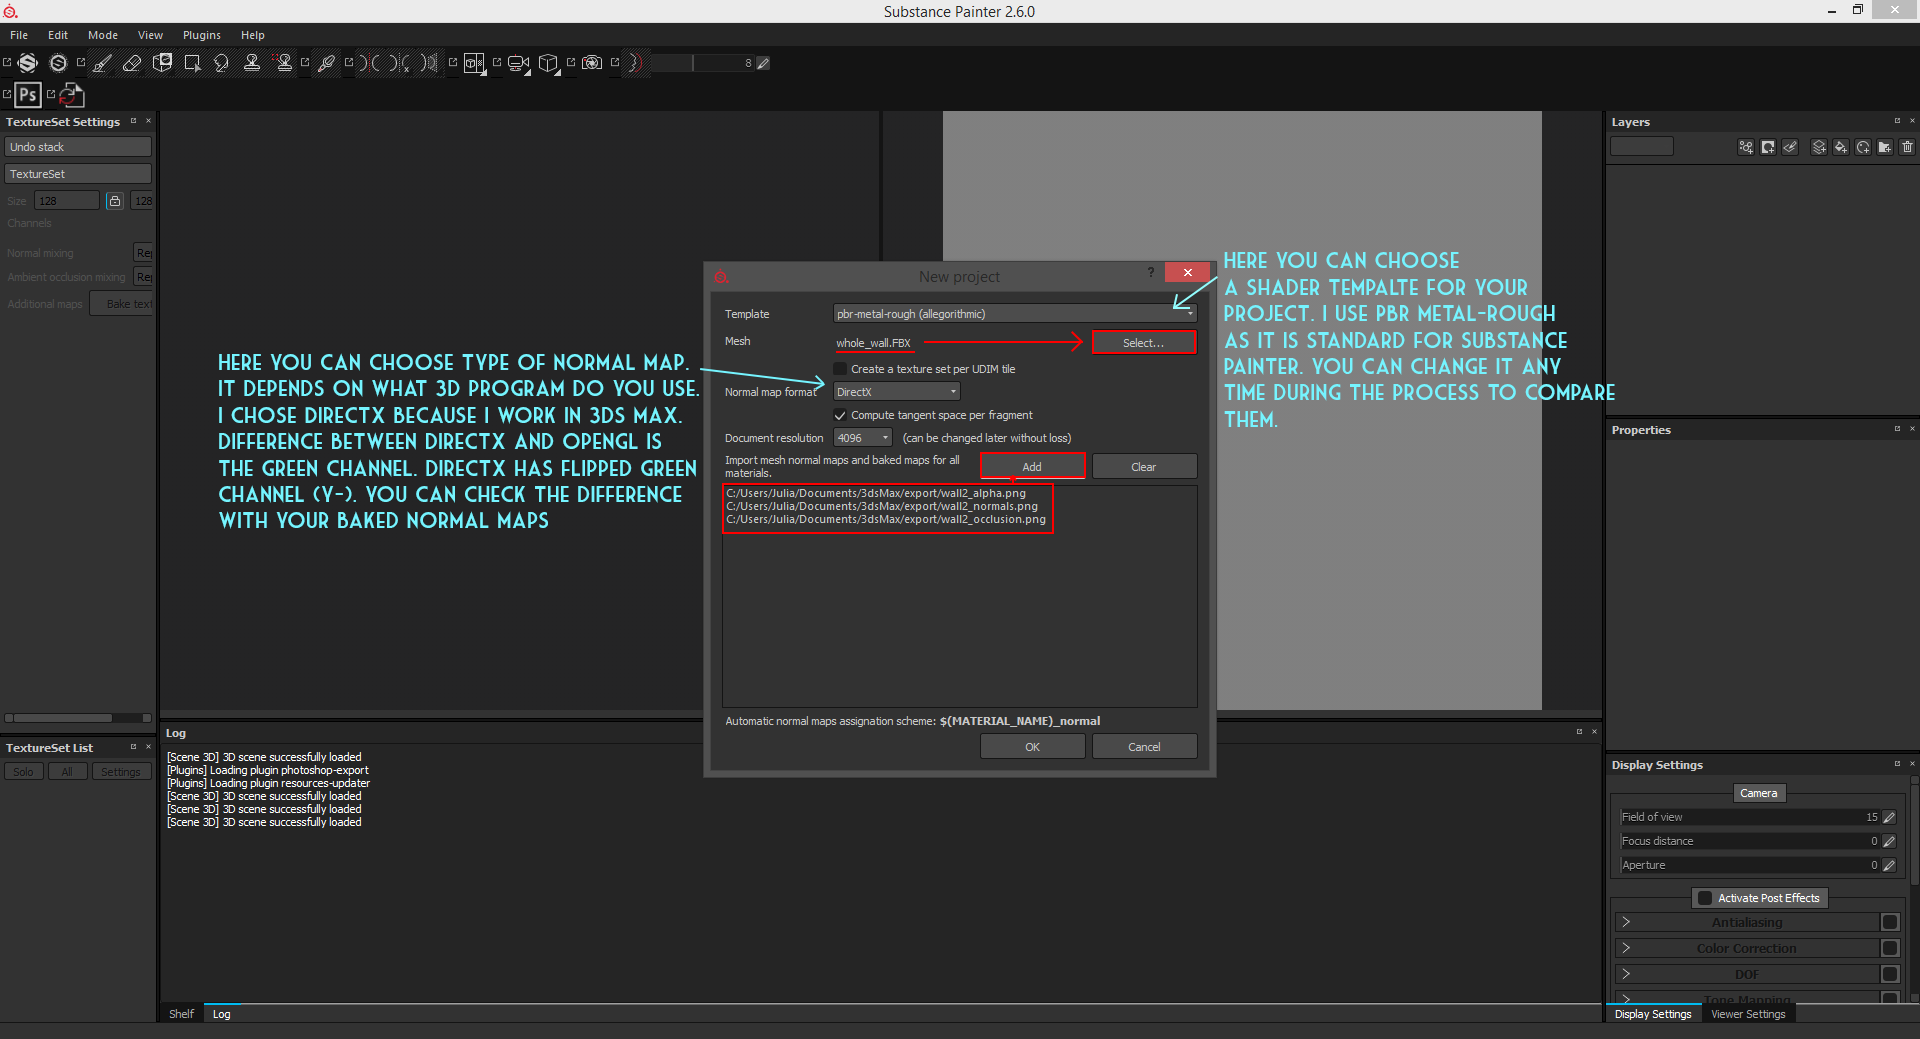
Each time a new project file is created in Substance Painter, this window appears. From here, the mesh and supporting textures can be opened (if you have any).
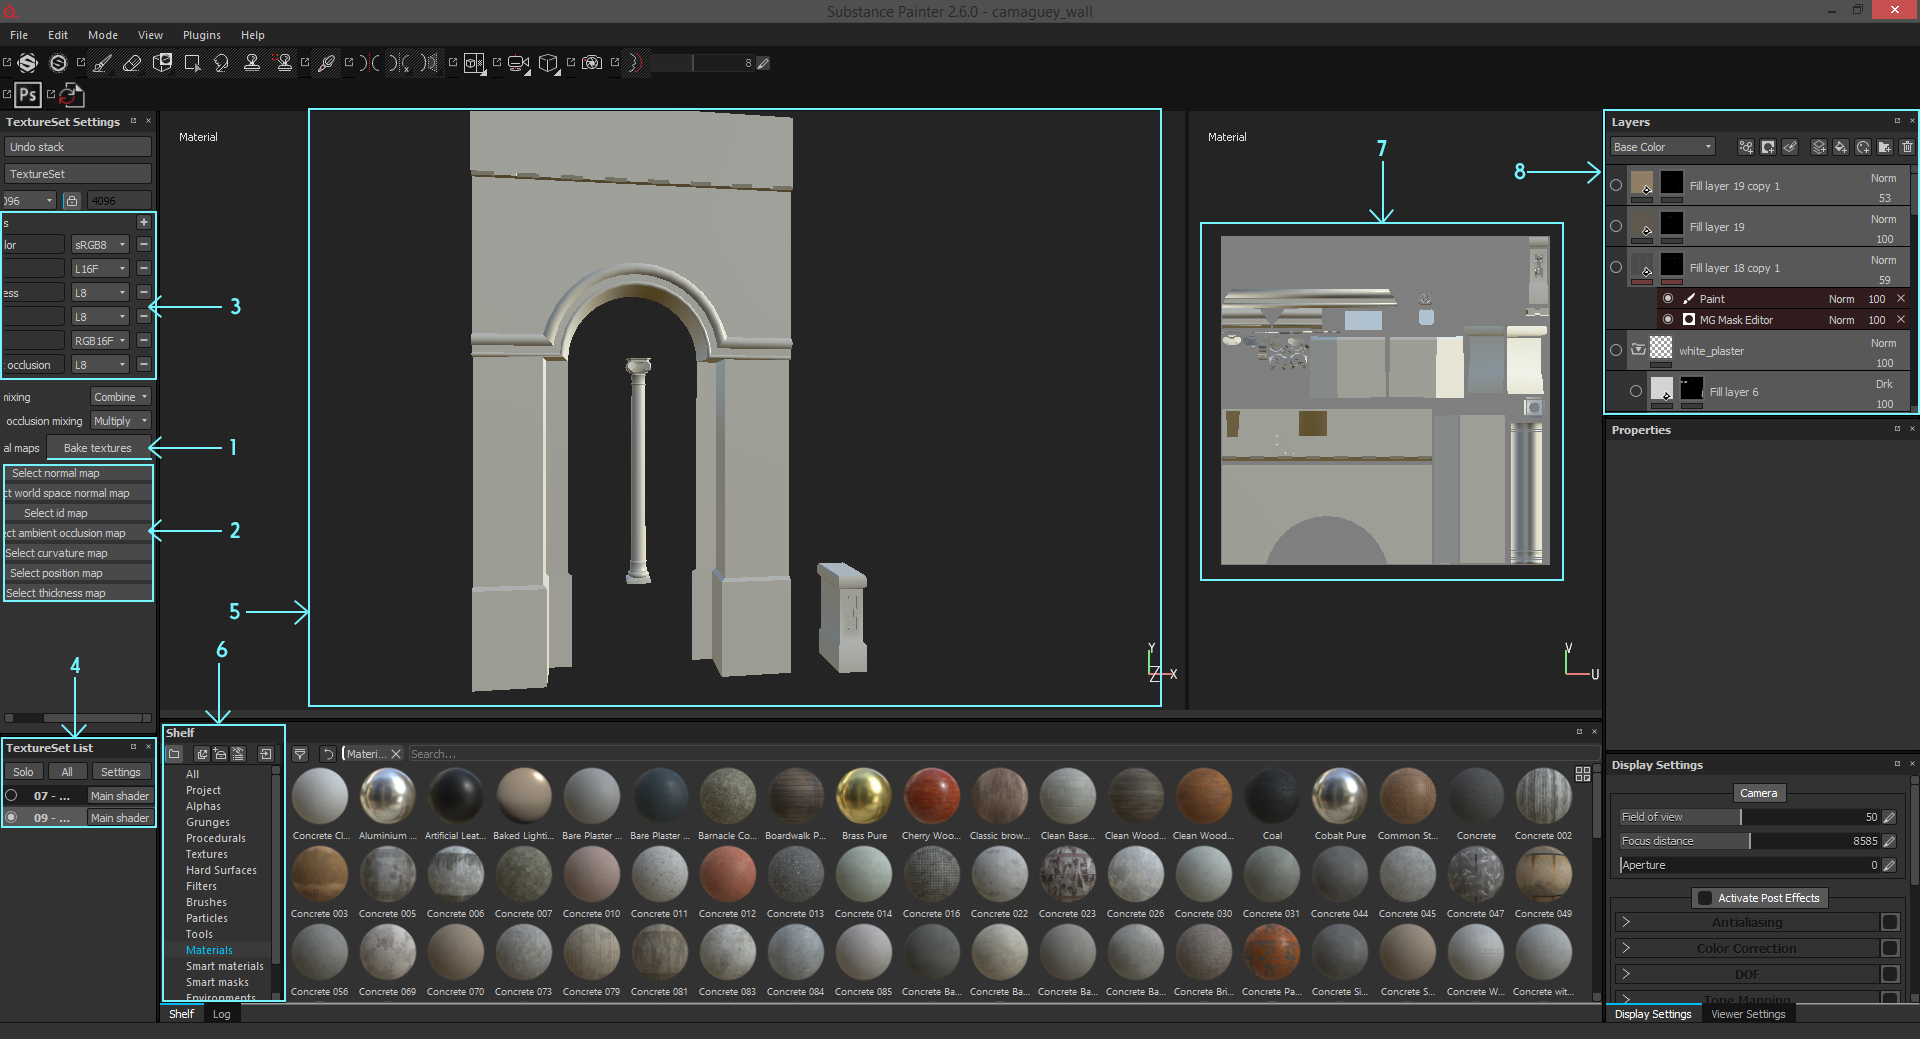
After that, the low poly model will be shown in a 3D viewport. I'll briefly explain every window I used here.
1. Initial point - Start with this button. Don't start texturing if you haven't baked your maps. The beauty of Substance Painter is that it gives you the ability not only to texture, but to also bake maps. I think it's amazing, but I used to work with xNormal.
2. Set of baked textures - This set appears after baking.
3. List of textures that can be controlled during the project - More textures can be added with the "+" button. I recommend adding AO (Ambient Occlusion) map to this list.
4. Set of textures - If different color IDs are used on the model, then the model will be separated by different texture sets in Substance Painter. This can be useful, but the sets need to be stitched together in Photoshop. Some view this as a problem, but a solution is to assign one color ID to whole model (or one material) in your 3D application.
5. 3D viewport - Here you can view and work with the model.
6. Shelf - In this window, one can switch between textures, brushes, materials, etc. Here, everything needed for work can be found, such as imported textures or materials added from external sources.
7. UV (2D) viewport - In the event that the model cannot be painted over, it may be easier to paint straight on the UV (like in Photoshop).
8. Layers - This tab shows and controls all the materials and fill layers applied to the model.
This is a baking window. Here you can bake from high poly onto low poly, or from low poly onto itself.
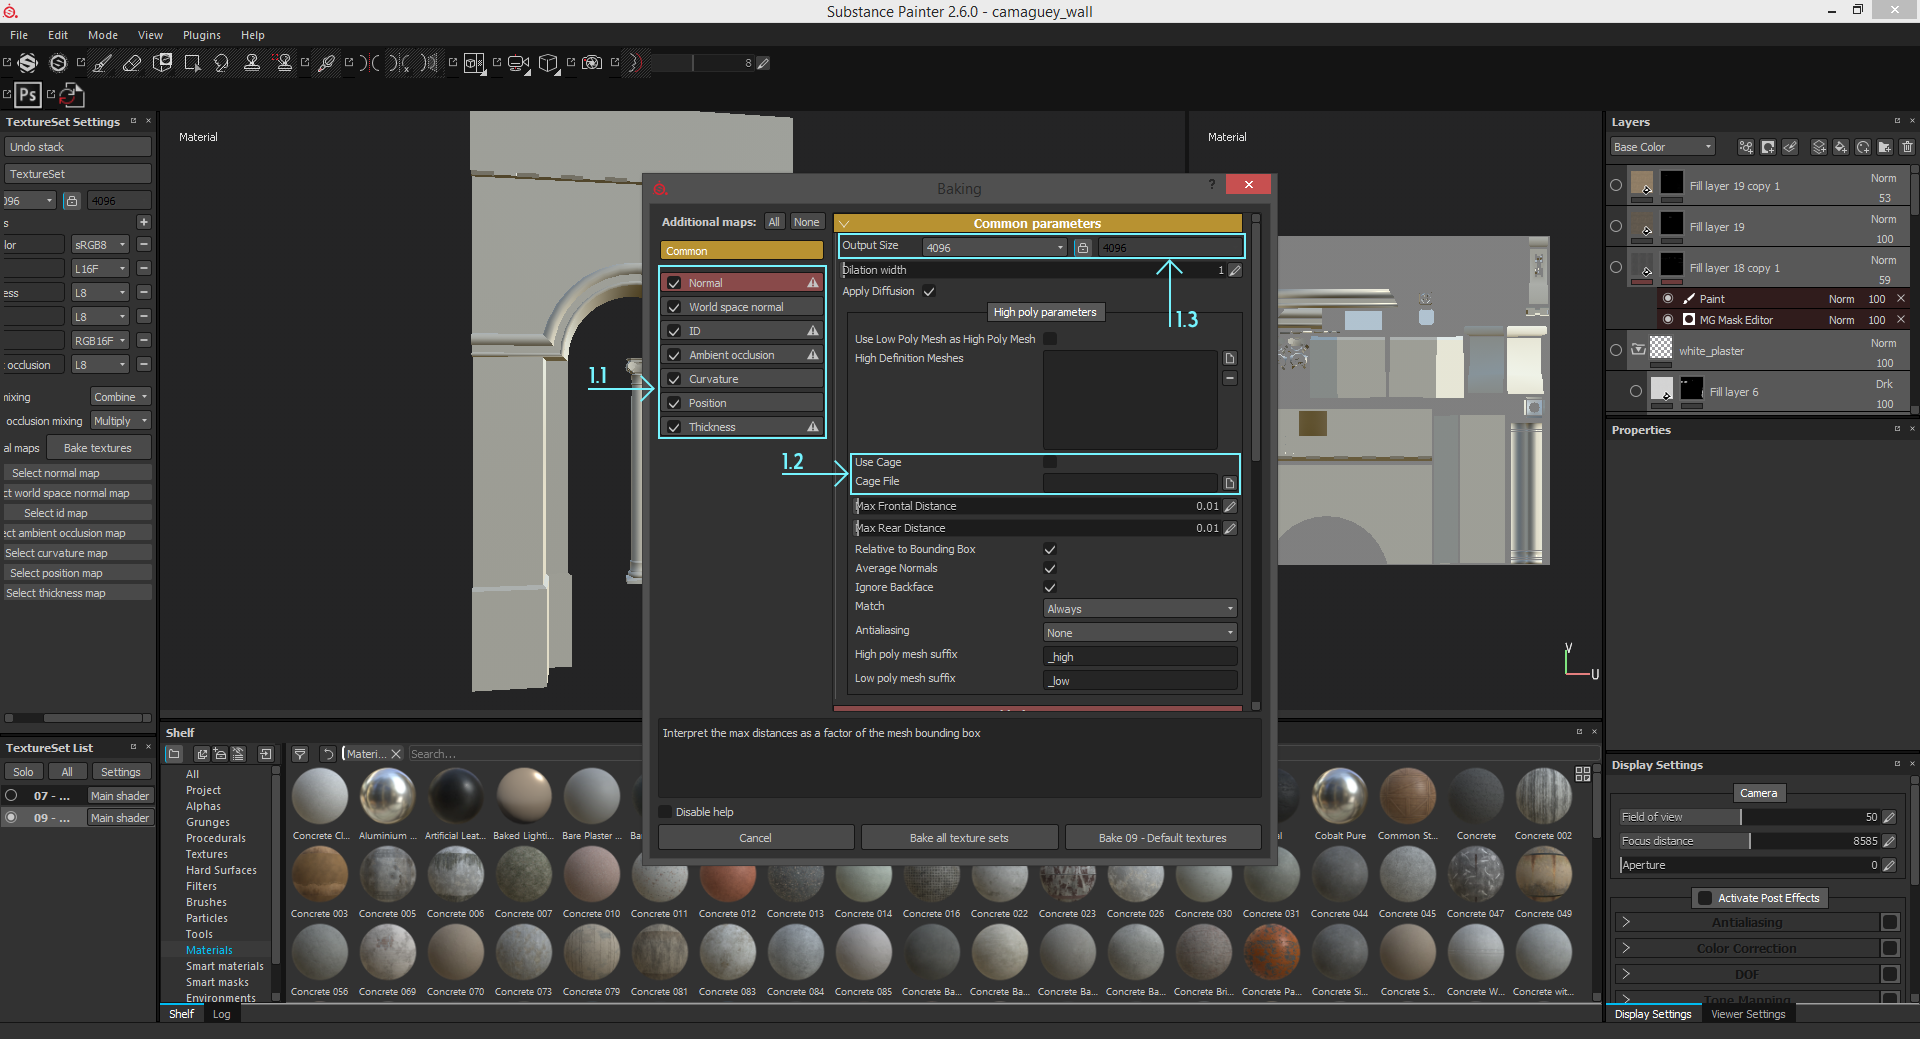
1.1. Bakeable Maps - This tab shows all the maps that can be baked. Ensure that all checkboxes are checked.
1.2. Use Cage, Cage File - In order to bake from high poly onto low poly in Substance Painter, import the high poly mesh and cage mesh.
1.3. Output Size - The texture size of baked maps can be set here. I always set this value to the same as I set it in the very first window.
Then, simply press "Bake" button and wait.
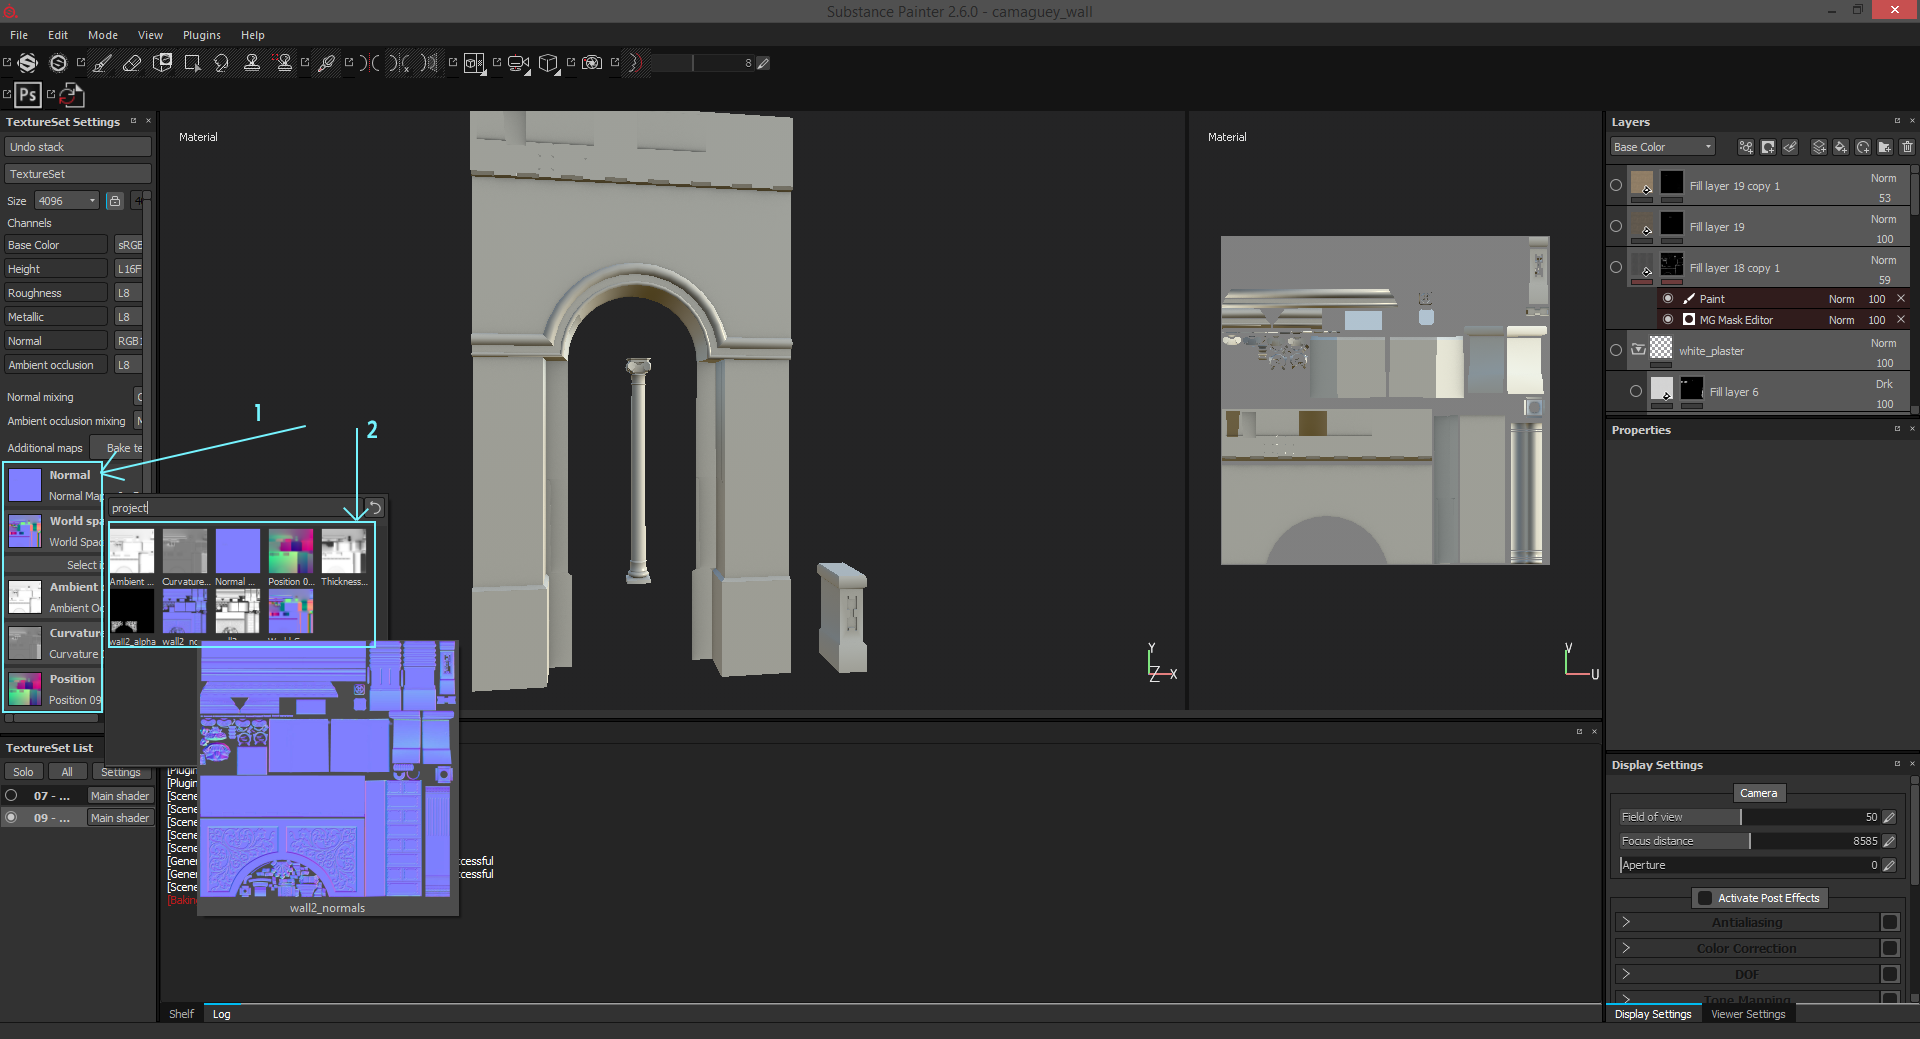
I baked from low poly onto low poly. I placed some UV islands on each other, that's why there are visible artifacts. However my normal map (baked in xNormal) is clean, so there won't be any artifacts showing. Once baked, the tab with textures (1) is refreshed. If the maps were baked in an external app, then the standard maps can be replaced by your own (2).
Exploring Texture Settings in Substance Painter
I will briefly go over the abilities and general operation of the texture settings.
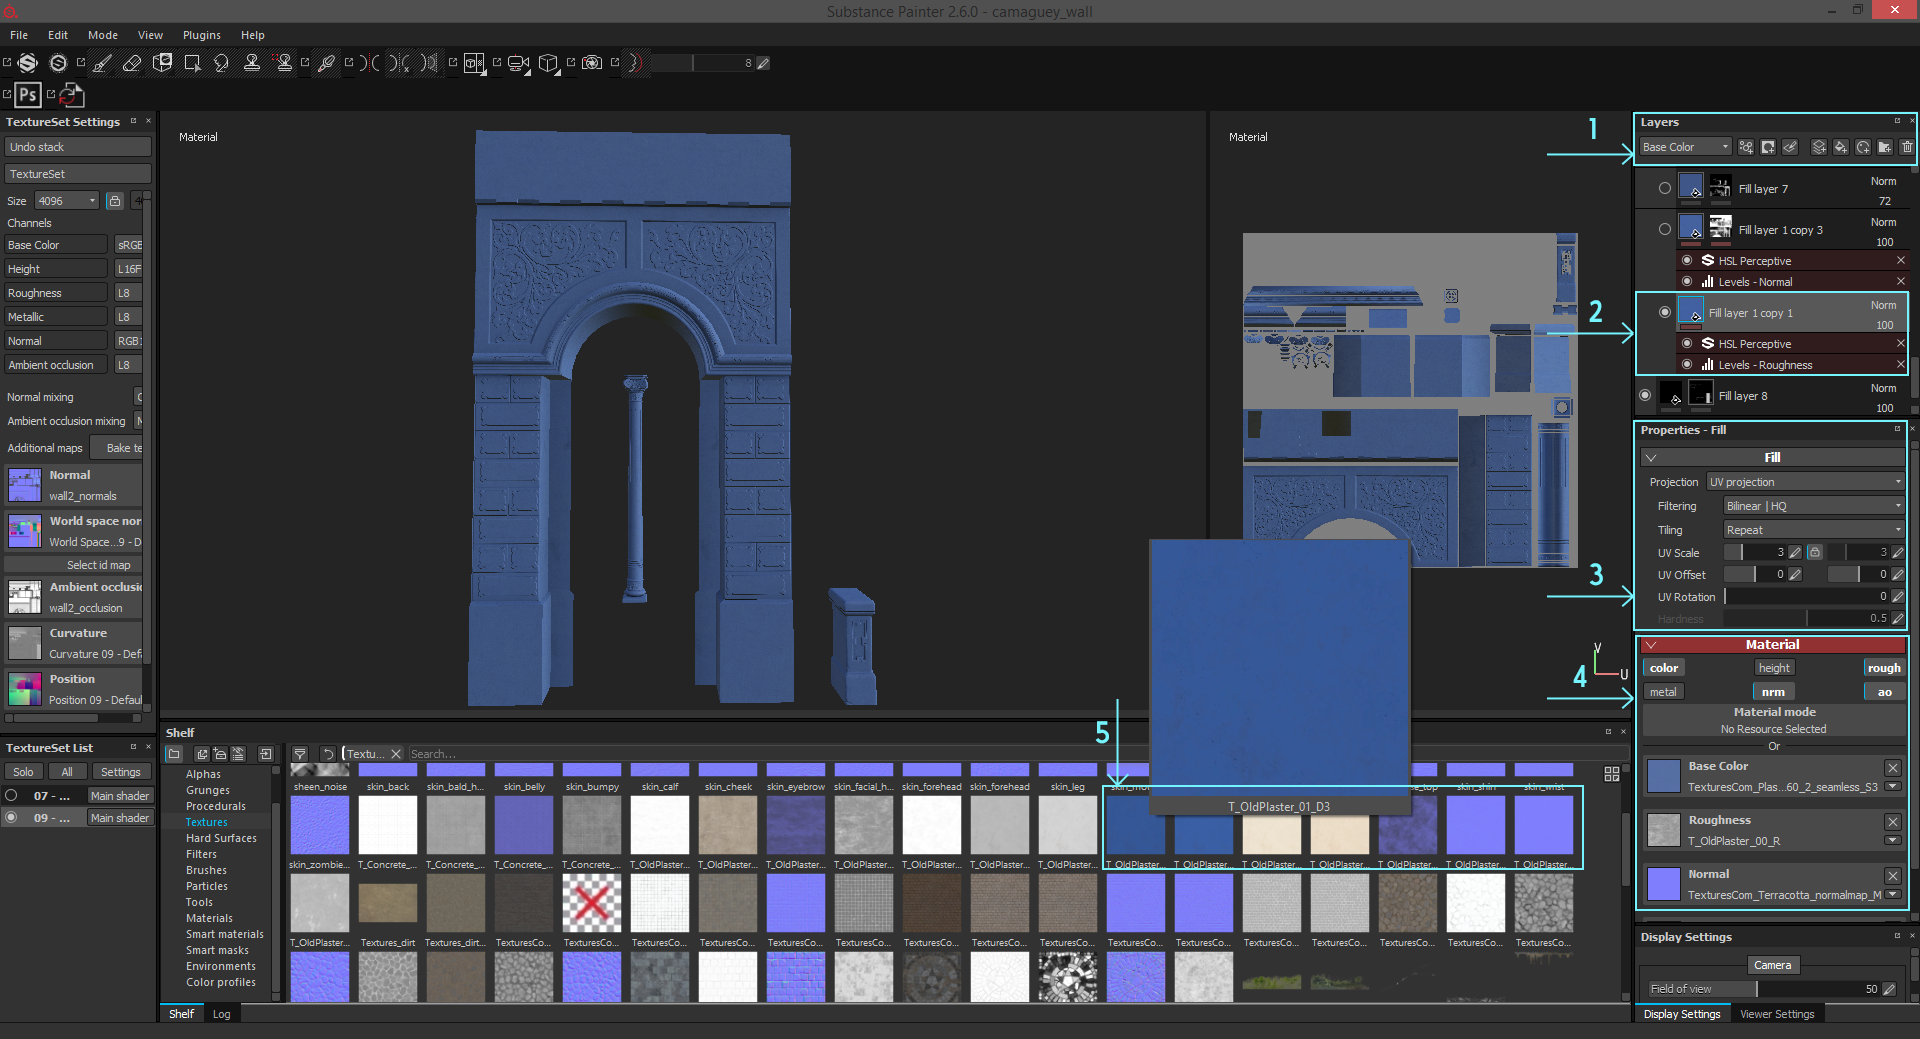
1. Layers Stack - Here, one can add a new fill layer, new paint layer, new material and new group. The Fill Layer fills all UVs, so it can be used for maps, and edited with masks and generators. Paint Layer allows you to paint with selected textures locally using a brush (although I rarely use this tool). I also use Groups to remove the mess and to organize layers.
2. Selected Layer - I created a Fill Layer that fills all the UV space. It can be controlled in Properties, Levels, as well as Effects. The transparency and blending method of each layer can be changed here.
3. Properties - This can be configured to show how the textures will work on the model. There are triggers to switch between UV projection and Tri-Planar projection. Also, tiling can be set by changing the scale of the texture or by moving it on U and V axes. The texture can be rotated in the Properties tab, as well.
4. Material Settings - There are several different types of materials in Substance Painter. Procedural Materials with sliders, Smart Materials with groups of standard or procedural materials and with generators applied to the layers, and your own manual materials with textures. In this tab, you can input all your textures or play with sliders. Here, I used a plaster texture previously downloaded from Textures and prepared for full usage. I created AO, Normal and Roughness maps manually in Photoshop and uploaded them to Substance Painter. Double check that all needed channels are turned on. Info regarding the meaning of each texture can be found on Substance Painter (Allegorithmic) website.
5. Shelf - Here are my textures displayed in the Shelf.
Using Masks and Decals to Create Realistic Textures in Substance Painter
After preparing the plaster texture and applying it, the model is filled with one blue plaster texture. This is not the desired end result:
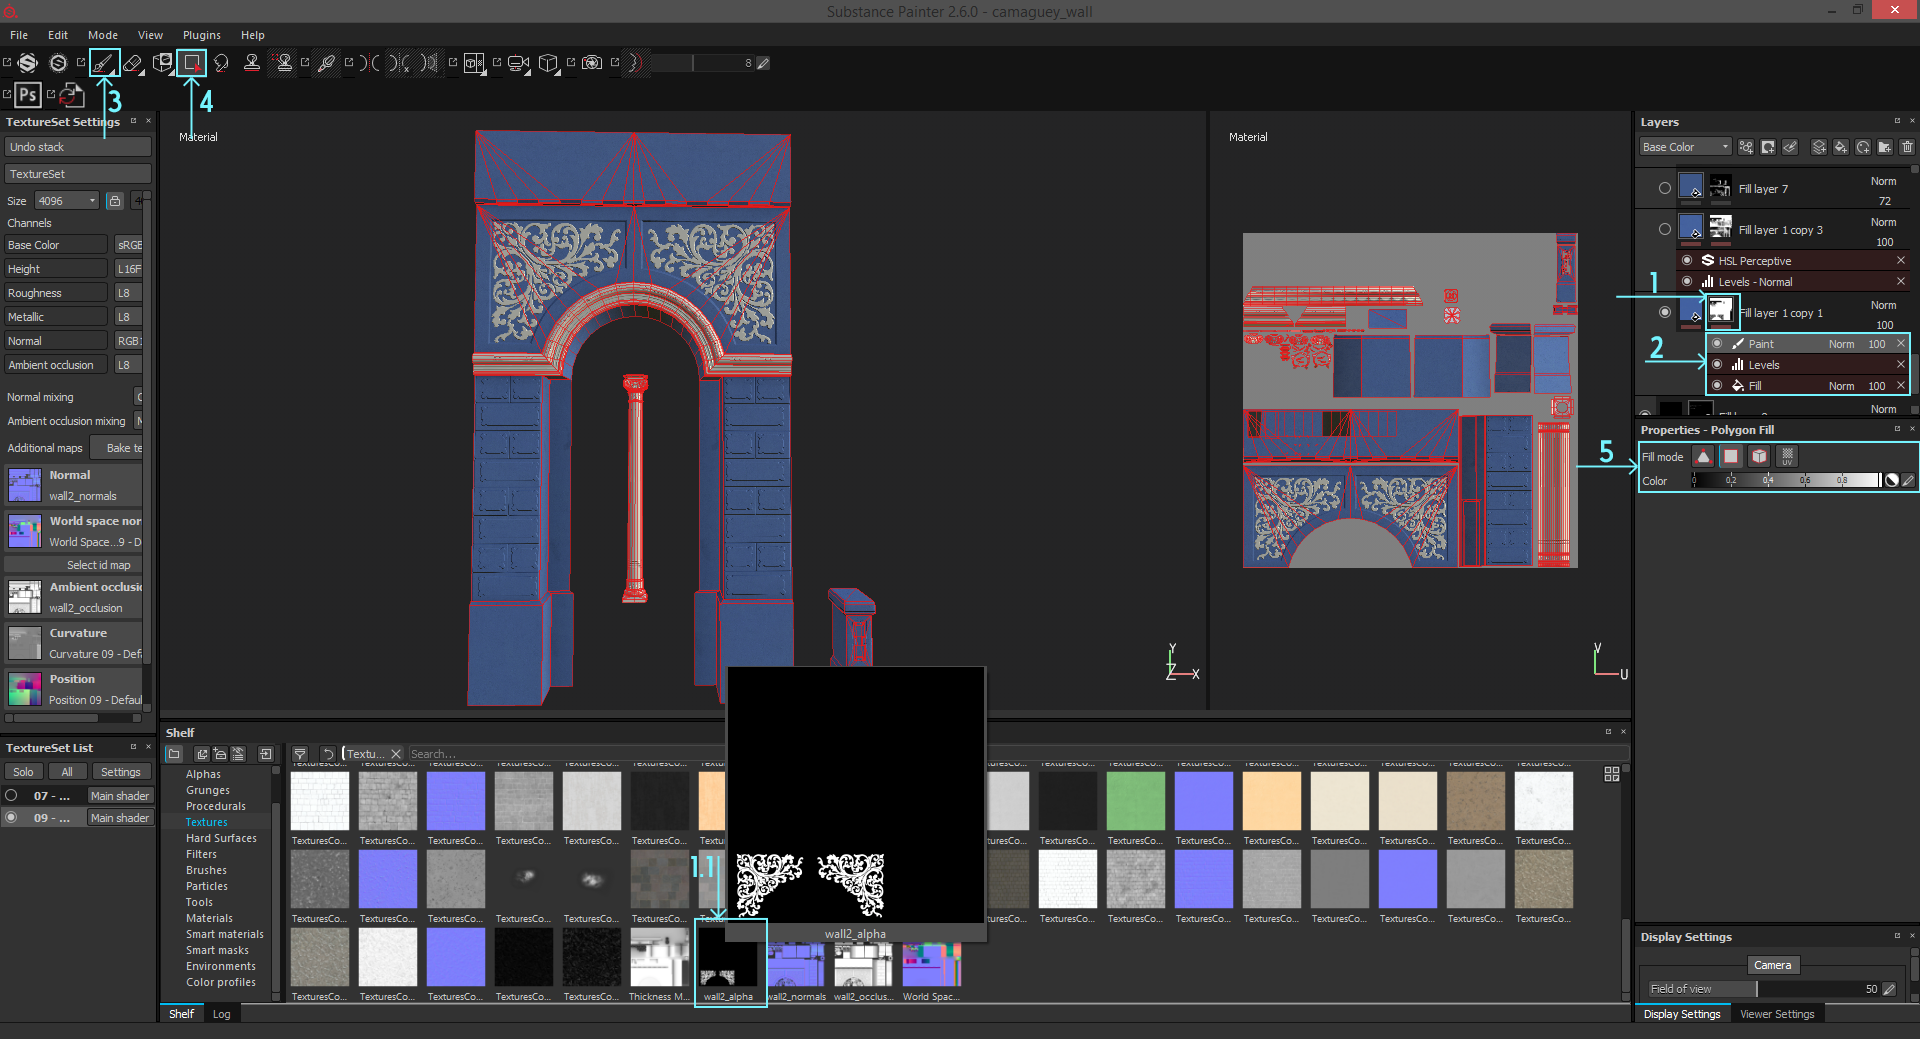
When right clicking on the material layer, there’s an option to add a mask. I choose "Add a bitmap mask" because I already created it manually in Photoshop. I created a Grayscale mask (1), where white is opacity of the chosen layer and black is transparency. Shades of grey can control the level of transparency. My black and white texture for the mask (1.1), where flower decorations are painted as white color on black background. I made this by painting over my AO map in Photoshop. Some operations with the mask can be performed in the Layers tab (2). Paint Sub-layer can be used to paint over your mask with a white or black color, and generators can be added as well. There are modes for painting with a brush (3) and for choosing polygons or UV island (instead of manual painting) (4). I chose the latter to easily select a UV island that I didn’t want to be filled with the blue plaster texture. I used the black-white slider to choose the color of the masked area (5). These same operations will be performed for the white plaster and other materials.
To make my texture more interesting, I decided to add some dirt, leaks, and cracks.
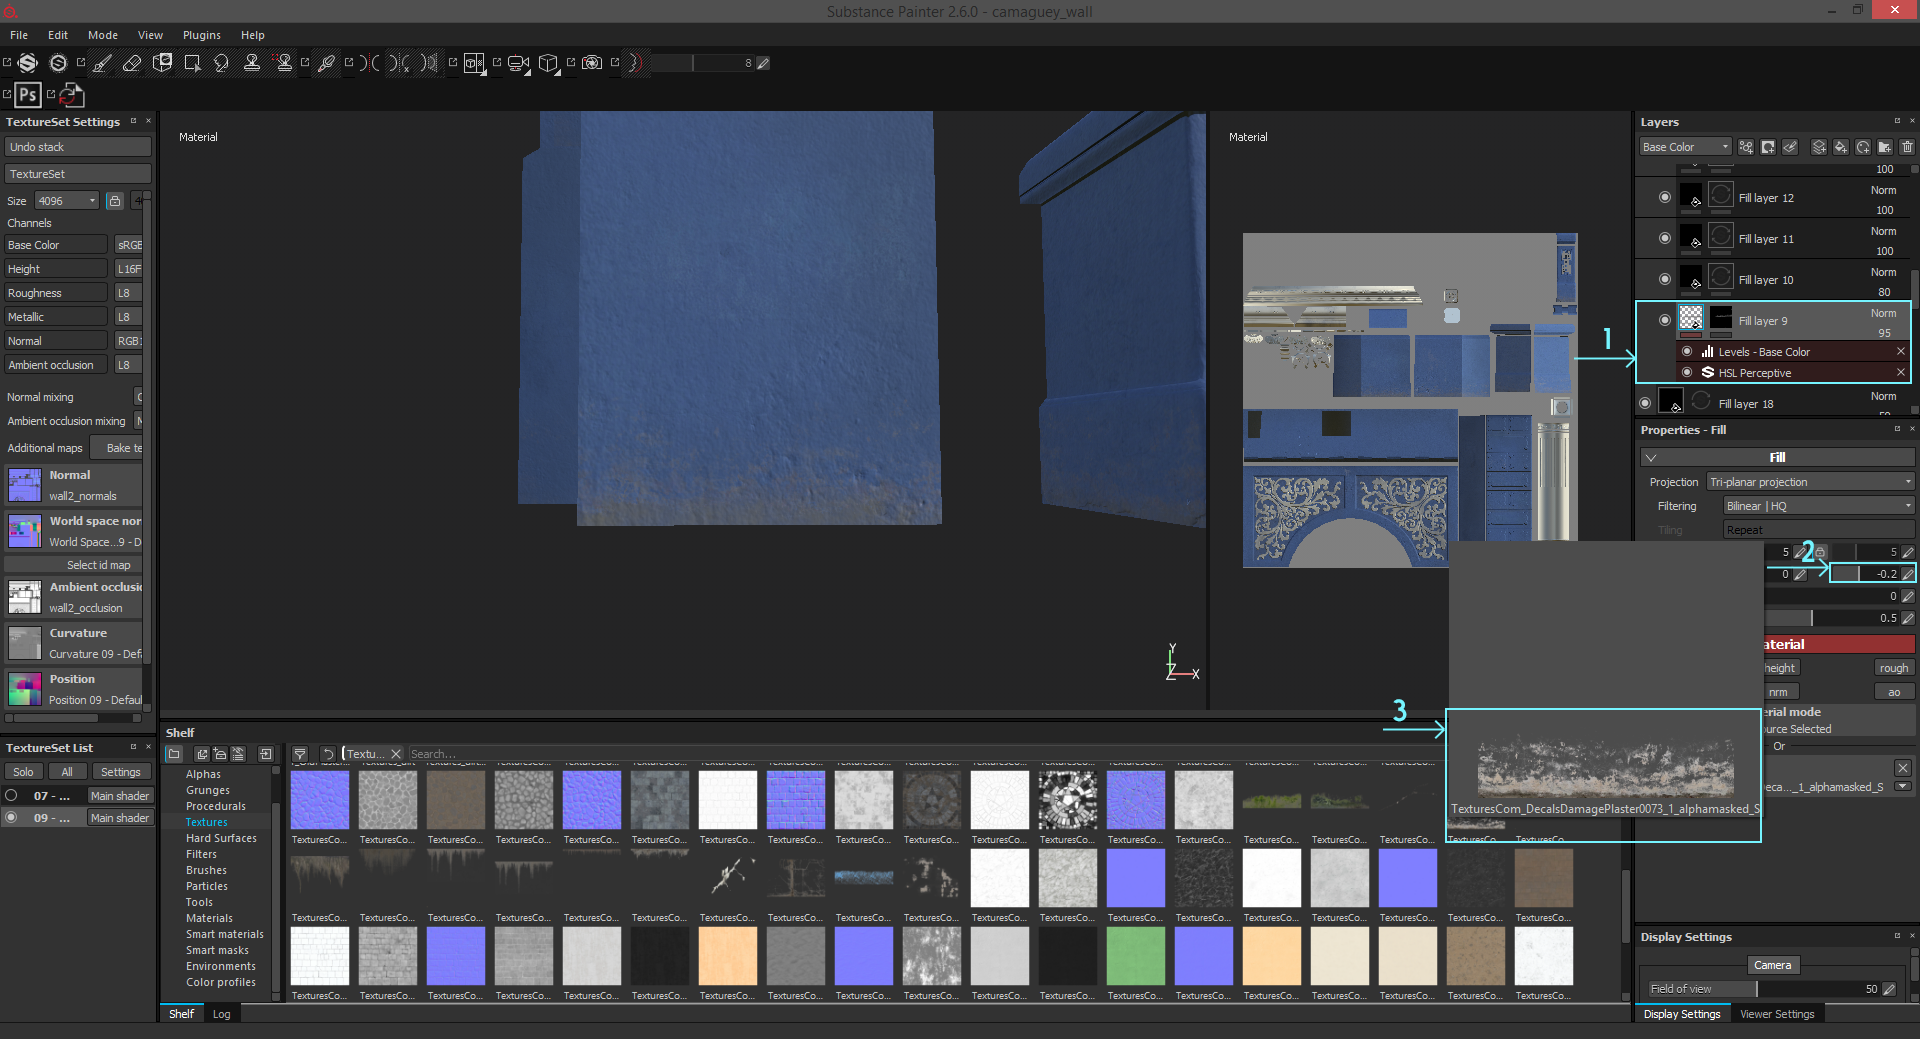
I created a new Fill Layer with texture (1). A black mask applied by default and I painted the white color on it where it was needed. I shifted the texture using this toggle in the Properties tab (2) and then selected a decal texture of bottom dirt on a transparent background (3). It was tiled across all models, so I shifted it into the correct position and applied a mask. Make sure that the image is square, otherwise, the decal will be stretched.
To make the model seem more realistic, I added some hand-painted dirt. This can also be done with a curvature map and generators.
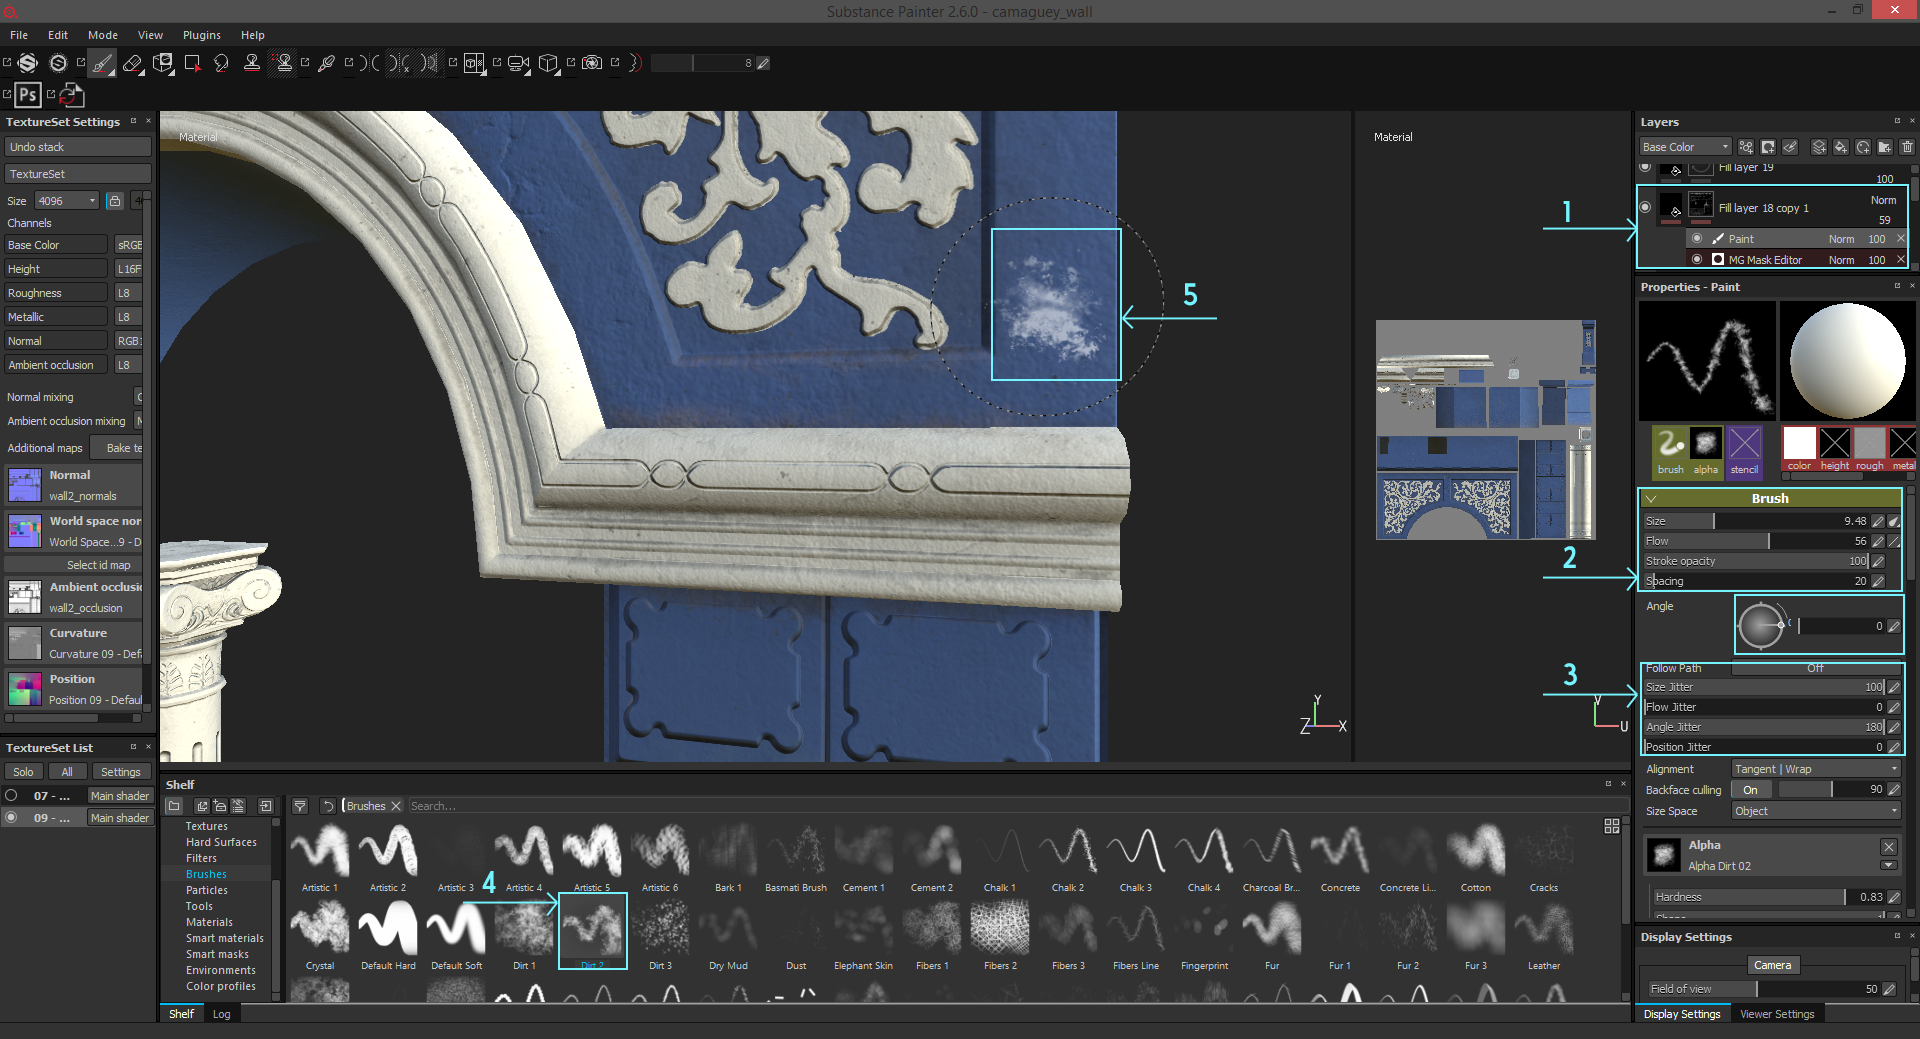
I created a new Layer with color and roughness control (1). A black mask is applied, so the dirt will be visible only where I paint with white or gray color. In the Brush tab (2), properties of the brush can be changed including the size of the brush, control pressure of the brush, the spacing between strokes, and the angle of the brush's alpha. I’ve also toggled the brush randomness (3) that determines how random the brush will act after each brushstroke. If I wanted to select a different brush, that can be done in the Shelf (4). I did a test brushstroke to see how it would look in the viewport (5).
Here’s the result:
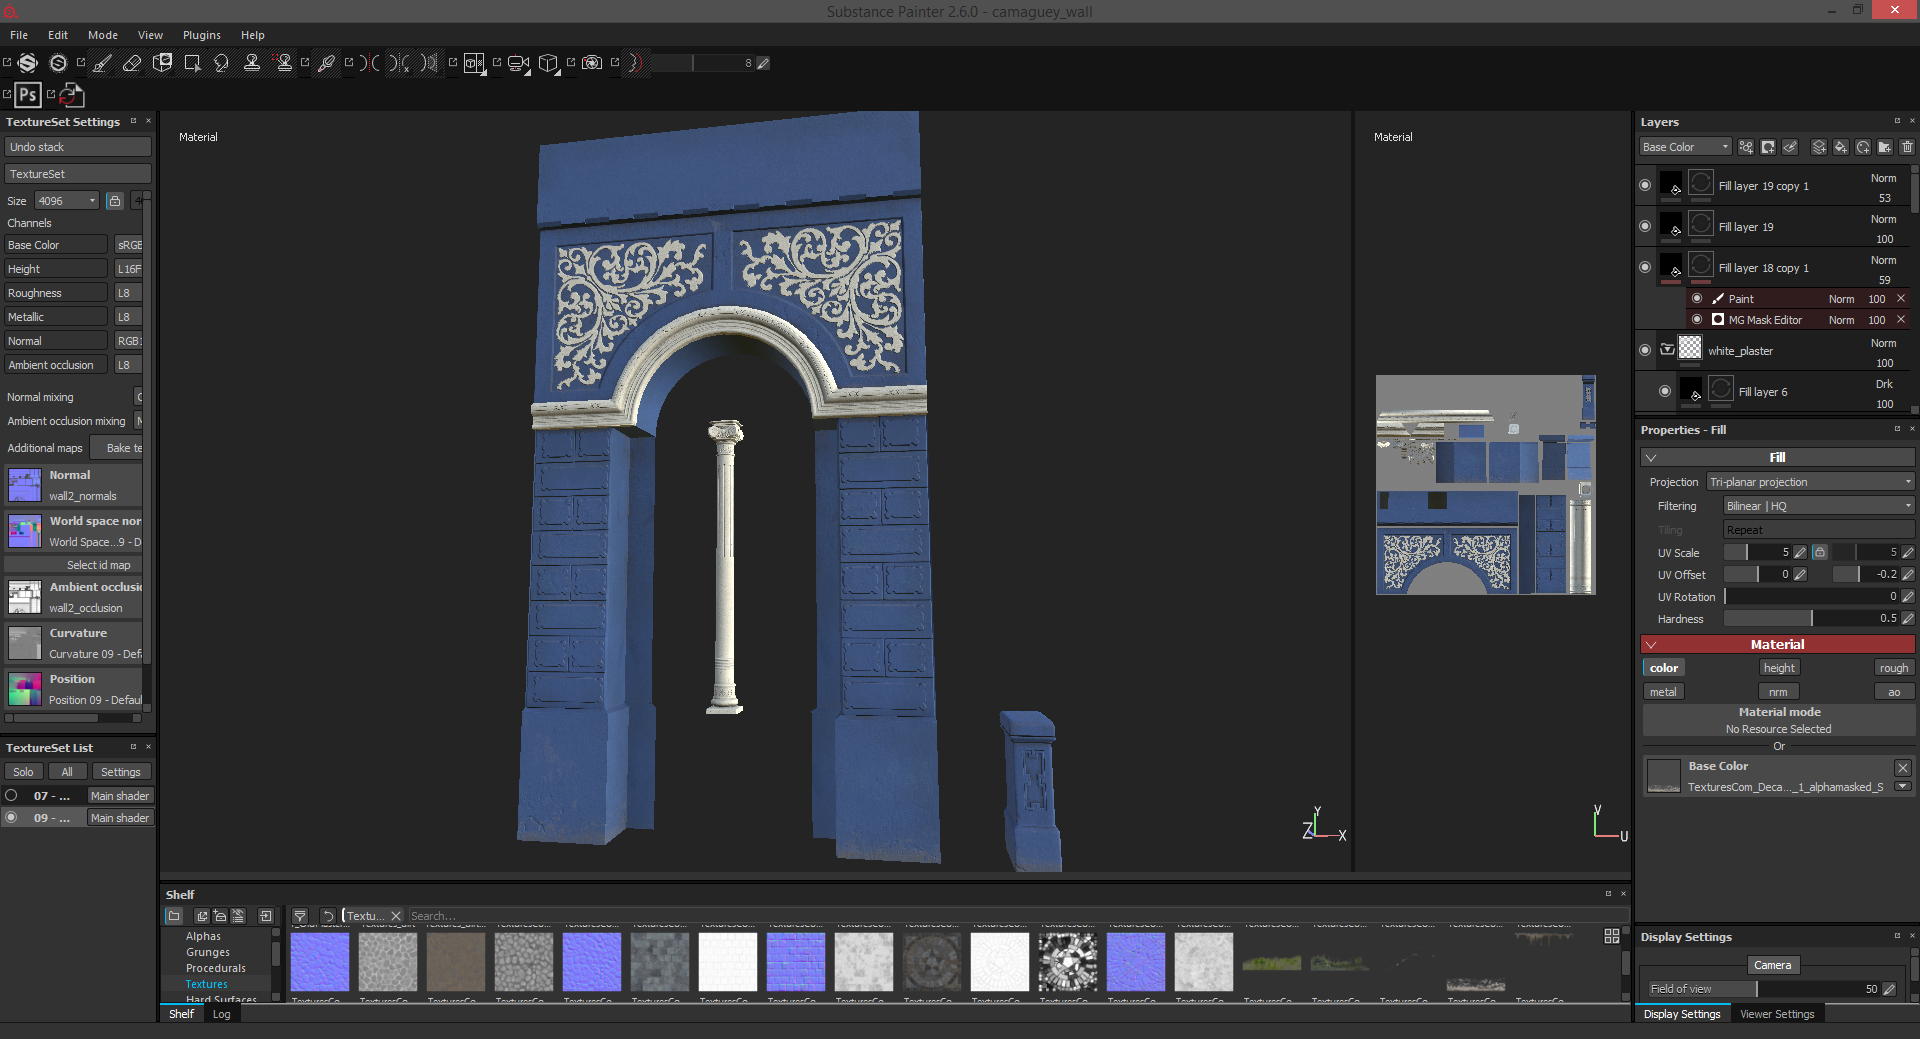
As explained in the previously, it’s good practice to fill the whole UV space when unwrapping the object. Doing so helps save memory and provides a good resolution. For this object, I chose a 4096x4096 (4K) texture resolution. It is quite large, and uploading and applying material in Substance Painter will take a long time. On some mediocre computers, this process can cause an error and close the app. I decided to texture this object part by part to avoid such an error.
First, I detached some elements from the object and uploaded them to Substance Painter. This is the reason why the UV space is partially empty. I was able to easily texture these remaining elements and export the texture. Then I uploaded the rest of object and textured it in another session. Since both parts of this object still use same UV space, I could easily attach both texture sets together and receive one complete texture set with all UV space filled.
Exploring Export and Configuration Settings in Substance Painter
And the last thing is to export:
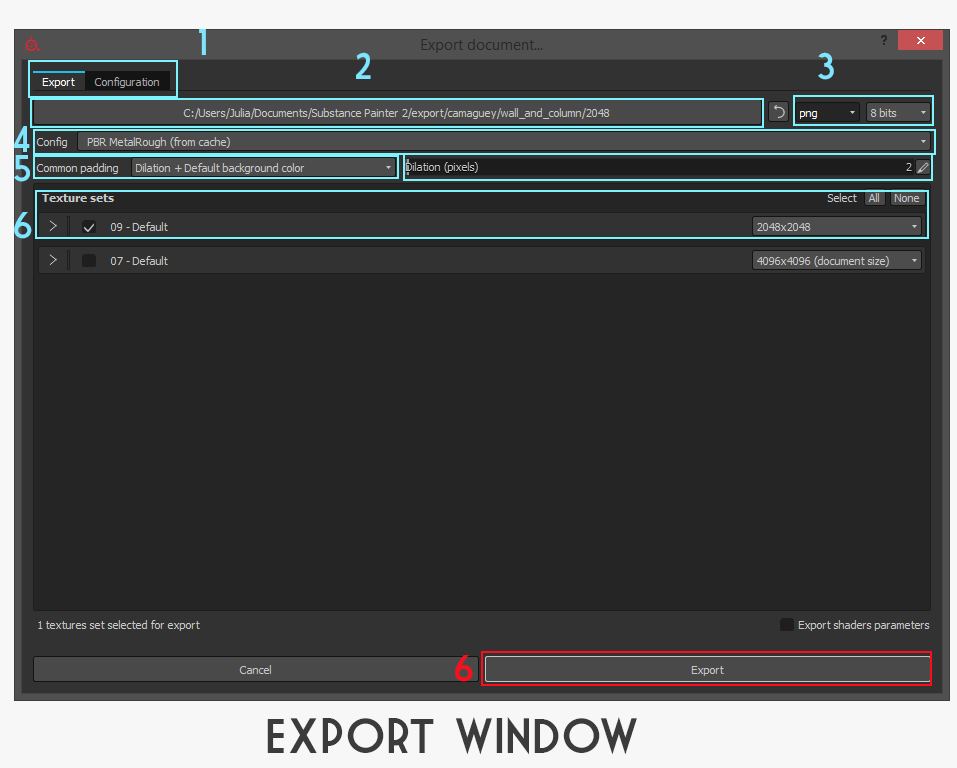
Setting up the Export Window in Substance Painter:
- Switch between "export" and "configuration" windows.
- Choose save path.
- Choose file format of the textures.
- If using PBR Metal-Roughness shader, it may be best to use same the for the export configuration.
- Padding spreads the texture on some distention from UV islands. I use "dilation+default background color" or "dilation+transparent background." Dilation pixels slider allows you to choose how far your texture will be spread. I use number two for this.
- Check the texture set to be exported and it's resolution.
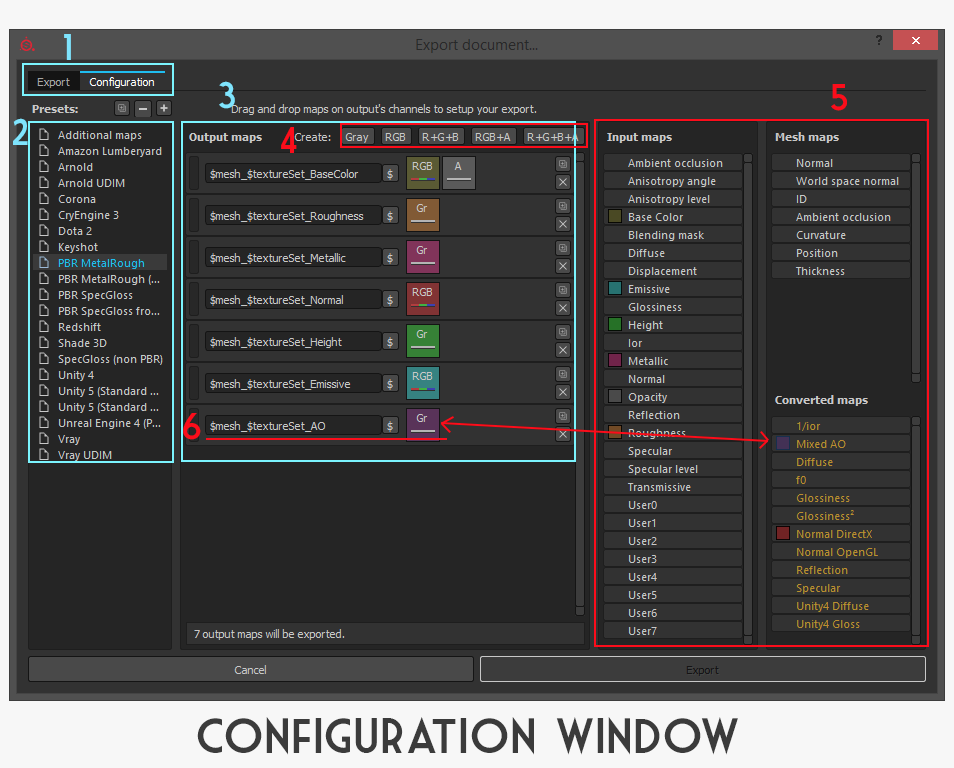
Setting up the Configuration Window in Substance Painter:
- Switch between "export" and "configuration" windows
- The Presets tab is a helpful thing to save time. The desired preset can be chosen here, and the choice can vary depending on your goals. I prefer to use "PBR MetalRough" preset.
- A list of all output maps.
- Each map has a grayscale or RGB scheme. To add another map, press the according button. R+G+B allows textures to be packed in RGB channels of the map. R+G+B+A - same but a fourth texture can be packed, like Opacity, for instance.
- List of all possible maps. This can be maps converted from your workflow or those which were imported in the beginning.
- The Ambient Occlusion map is very important, but it is absent in MetalRough preset, so I added it manually. It has a grayscale scheme.
Stay tuned for the next segment of the tutorial: working with maps!

