Welcome to Part 2 of our 2-part PBR Artist interview series! Part 1 was posted last week. We sat down with two great TurboSquid artist to talk about tools, workflows, and tactics for tackling PBR modeling.
This week, we spoke with Michael Weisheim, AKA michael weisheim woolfy, who gave us a detailed list of the tools he uses to design, create, and convert all the pieces needed for great PBR models.
TurboSquid: Physically based rendering is gaining in popularity these days among 3D artists. What was the reason you decided to implement a PBR workflow in your own models?
Michael Weisheim: I first experienced the new PBR technology a few years ago when Marmoset Toolbag 2 was released. I was very surprised by the quality and natural appearance of the objects, especially metals. The shading technology technology amazed me! And all this in real-time!
TS: As the PBR Metallic workflow continues to increase in popularity, what software/tools have been vital to you when creating content, and why?
MW: Right now, when it comes to the PBR texture painting, Substance Painter is my absolute favorite.
I very much like the way it prepares all the needed technical textures (e.g. Normal, AO, Curvature) for you, and it lets you use them in masking to create nice wear and tear, dirt, rust and other great effects.
Marmoset Toolbag is one of my favorites when it comes to previewing the models in real-time and testing the textures/shading in different environments.
Another great tool that I now use is Blender. With new PBR capable viewports, it’s just amazing to model and see the model fully PBR shaded in real-time.
TS: Can you give us a quick rundown of your PBR workflow?
MW: For now, my PBR texturing workflow starts with high-poly modeling in Blender. I also load high-poly parts that I sculpt in Zbrush, and see how they look by adding PBR materials.
I try to assign basic PBR materials as soon as I finish the basic modeling. For example, separate cloth, metal, leather and see how it looks from a distance and how well the balance is between materials and colors. At this stage it is easiest to make changes and try different colorations.
When my high-poly model is done, I already have a basic idea of how my low-poly model will look in the end.
After completing the high and low poly models, I load them in Substance Painter, bake the textures, and rebuild the materials. Because I tested the models in Blender in a previous step, I can now finalize the textures by adding details and effects.
TS: Any tips or tricks you would recommend for getting PBR materials right?
MW: Yes, my biggest mistake at the beginning was to make the textures too dark. Even the darkest areas on the character that supposed to be black should never be 0% RGB (black) on the texture. The same for the whites. The whitest areas should never be 100% white. Just avoid the extreme values and the materials will look much more realistic.
TS: Outside of game engines such as Unreal and Unity, are there other advantages to working in PBR for you personally?
MW: Yes, even modern non-real-time renderers use this technology more and more. I use the same texturing pipeline even if it’s not a real-time renderer.

TS: How did you create the LODs in your Dragon Model?
MW: I was using 3ds Max and had an already skinned model, so I tried to find a way to decimate the mesh polycount while still keeping the skinning and texture uv intact. On the Scriptspot I found a free plugin called LOD Creator. This script is amazing. I was able to decimate the geometry and create already skinned LODs.
TS: Did you use a high-poly to low-poly workflow for this model? If so, can you describe it for us?
MW: Yes, indeed! I sculpted the dragon in Zbrush first and painted it using the Polypaint feature.
After the retopology and UV steps in Blender, I baked the Polypaint texture on the high-poly to low-poly model in Substance Painter by using ID map with the vertex paint option. The final texturing was finished in Substance Painter.
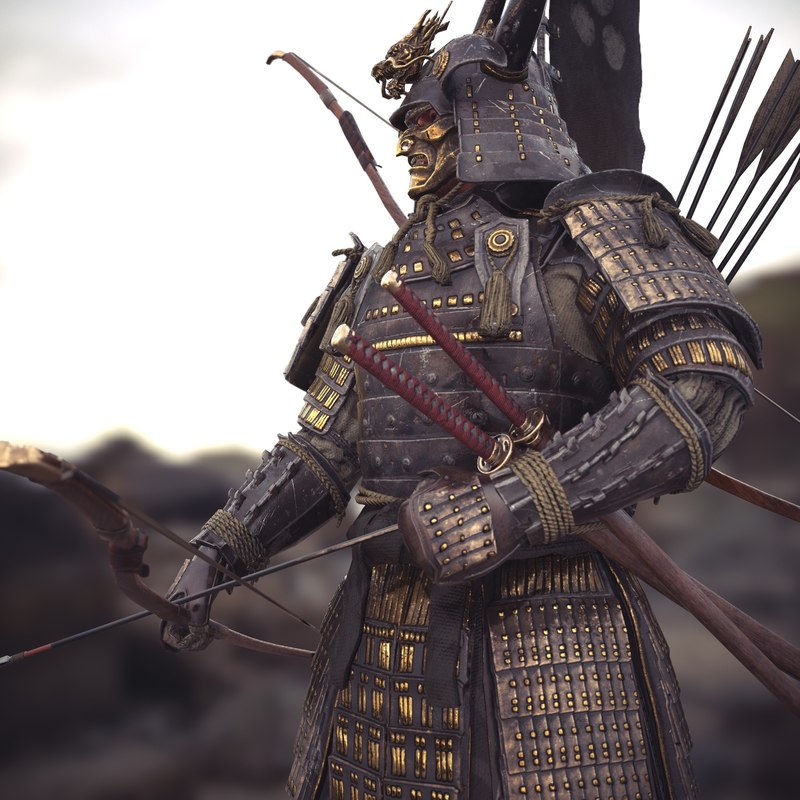
TS: Do you have any advice for tackling and intelligently separating PBR materials for models that include a wide spectrum of material types?
MW: Yes. In the Samurai Character Model, I used something called “ID colors.” I just assigned different materials with strong colors on the high-poly model in Blender. For example, I used strong blue on all metallic parts, red on the cloth areas, etc. Then I exported the high-poly model as an .obj file with material colors. In Substance Painter, you can bake colors to your low-poly model by using ID map. After this you can use the baked map as mask to separate different materials very clearly.
TS: Does using the PBR workflow influence how you might approach the modeling process for your character?
MW: Yes. Because PBR is possible in the viewport of Blender, I can tweak basic materials during modeling, which is amazing! I can even see the mostly final shaded model before I even begin texturing.
TS: When creating and testing your PBR materials, do you have any specific lighting methods that you use during your process to ensure the physical qualities of the material are accurate?
MW: At the beginning of the texturing process I like to start with already calibrated and scanned base materials. There are a bunch of already prescanned base materials in Substance Painter for most of the cases I’ll need. I use them a lot to be on the safe side and to not go wrong with basic values.
After my textures are done, I load them into Marmoset Toolbag, and I look at how the model looks in different lighting setting. PBR materials work very well with HDR environments, so I use mostly this lighting system to check my textures.
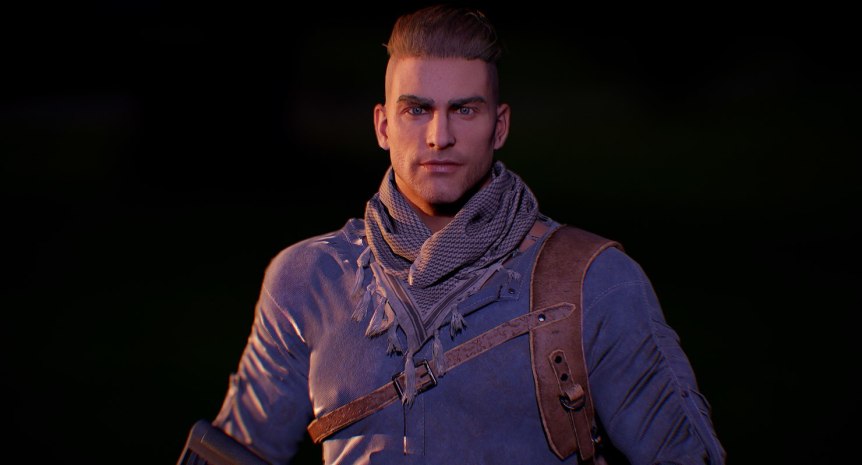
Michael Weisheim is a Diamond-level TurboSquid artist who started studying 3D art after high school as a way to combine his twin passions, drawing and video games. He has worked as a character artist with several game companies including Ubisoft in Germany. He currently works as a freelance 3D Artist and designs his own characters, which he sells on TurboSquid.
Thanks for that insightful look, Michael! If you’re an artist who is interested in being featured on the TurboSquid blog, email our content team at marketing@turbosquid.com.