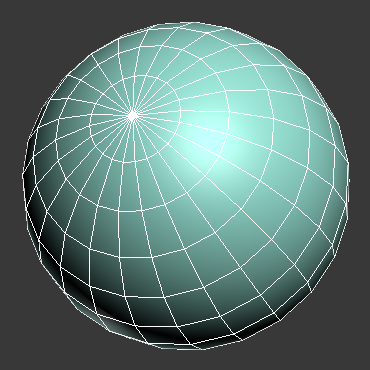
One of the most common questions we get about the CheckMate Pro v2 standard is about poles. A pole is a set of edges coming into a single vertex, the way edges are arranged around a vertex at the top of a sphere primitive.
In CheckMate Pro v2, we do not allow poles with 6 or more edges on curved surfaces. The reason for this requirement is that such poles can cause problems in renderings. The renderer interprets the pole as a sharp point, causing a break in highlights and textures. Such rendering problems are usually evident only from certain angles, so you might not see why we make this requirement. However, we want CheckMate Pro v2 models to work perfectly for customers no matter which angle they choose for a rendering.
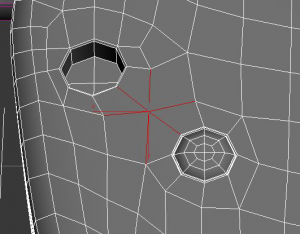
If your 3D model has poles with six or more edges on a curved surface or in an area that could have better topology, there are several easy ways to change the geometry to meet the specification. These changes won’t affect the overall shape of the geometry, but will avoid any possible problems with poles.
Solution: Reroute the edges
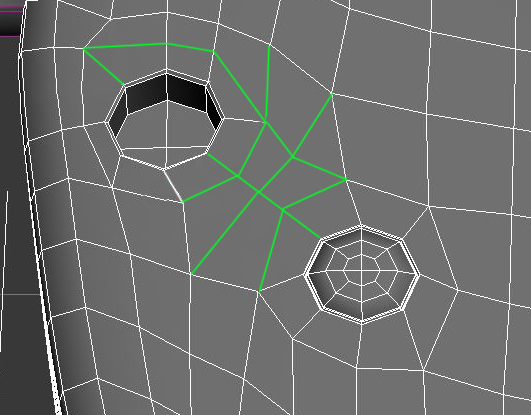
If your topology has poles on a surface, you can usually find ways to re-route the edges to have better edge flow. Sometimes this will require more edges, but that’s okay. If a guarantee of no artifacts from poles means the poly count is a little higher, customers don’t mind. They also like to be able to select a series or “loop” of edges with tools within their 3D software.
There are often several ways to reroute edges. The example above is just one. Considering the ease of selecting edge loops can often point the way to ways to reroute your edge loops.
When you submit your 3D model for CheckMate Pro v2, our inspectors will assist you in improving your geometry by pointing out areas that should be fixed, and suggesting alternate ways to route your edges.


